
Move patients through the Front Desk
Updated Last verified against the product
In short
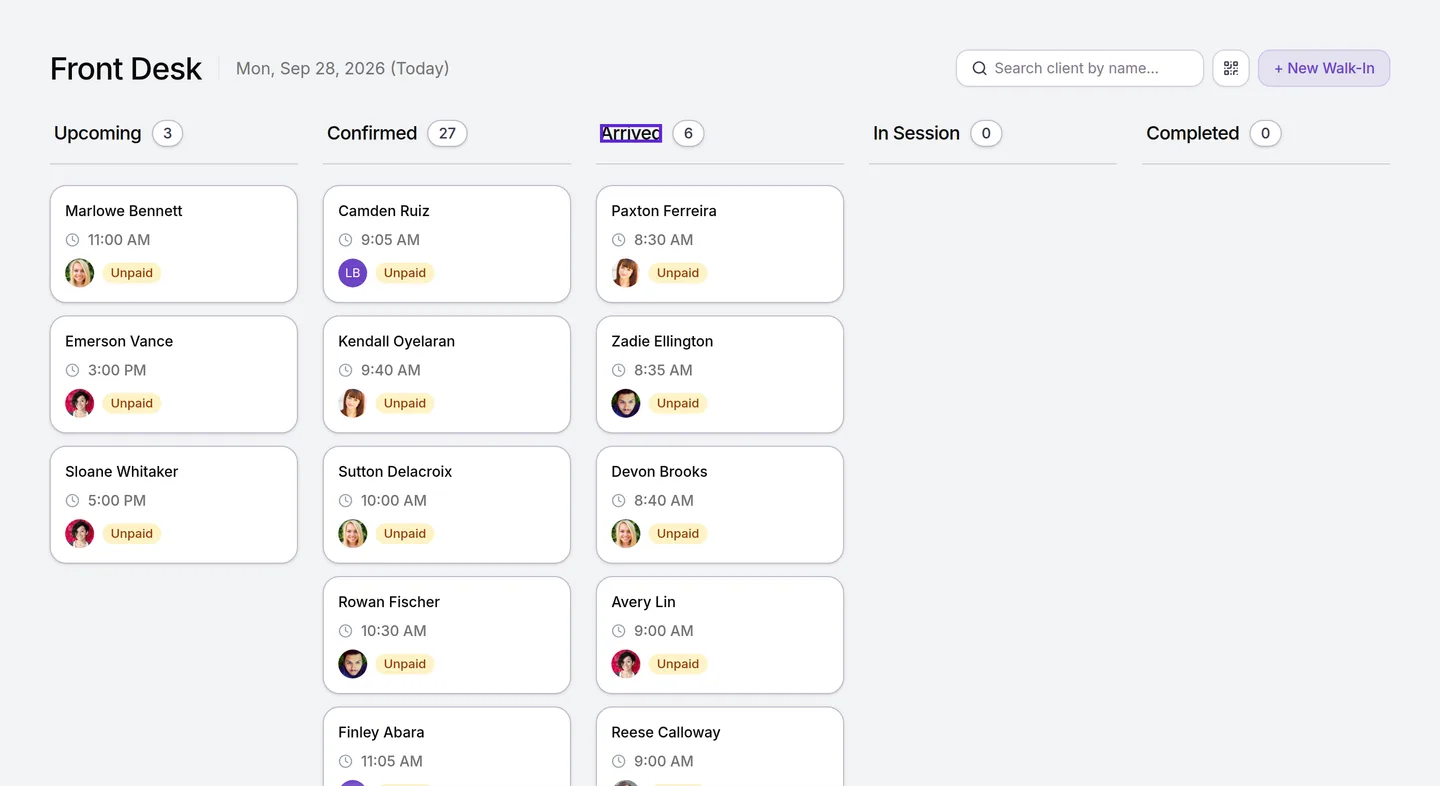
In Velarya, the Front Desk board shows today's visits at your location in five columns: Upcoming, Confirmed, Arrived, In Session and Completed. Drag a patient's card to the next column, or use the button in their panel. Add walk-ins with + New Walk-In, and move a finished visit to Completed to open checkout.
- Who can do this
- Admins, Location Managers and Front Desk. The board takes Front-desk board at View; moving and opening cards takes Calendar & appointments at Manage; walk-ins also take Check-in & scanning; promoting a walk-in and checkout take Transactions / orders at Edit; the QR scanner takes Check-in & scanning.
- Applies to
- Each location separately
- Plans
- Basic, Scale, Branded and Connected
- Time
- 1 minute per patient
Before you begin
- Today's visits are booked: Book an appointment for a patient.
- To award points on arrival, the check-in challenge gives points: Set up check-in rewards.
Move a patient through the day
The Velarya Front Desk board is today’s schedule for your location, one card per booked service, in five columns: Upcoming, Confirmed, Arrived, In Session and Completed. Each card shows the patient, the time, the provider’s photo or initials and a payment badge: Paid, Membership or Unpaid.
- Select Front Desk in the left sidebar. The page shows today’s date with “(Today)”.
- Drag the card from Upcoming to Confirmed when the patient confirms, or open the card and select Confirm.
- Drag the card to Arrived when they arrive, or select Mark Arrived in the panel. Velarya checks them in and adds any check-in points.
- Drag the card to In Session when treatment starts, or select Start Session.
- Drag the card to Completed when treatment ends, or select Mark Completed. The Checkout panel opens for payment.
For staff with Clinical charts & forms, the panel’s Forms & Charts block shows the visit’s forms and charts with their status, and Chart opens the visit’s Clinical tab, as Chart a visit: notes, charts and photos shows.
To find someone fast, select Search client by name… and type their name. Each result shows the patient’s column, and Check In next to a patient who has not arrived moves them straight to Arrived.
A red stripe down the left of a card means the patient has a scheduling alert, such as a timing or parking instruction (Add notes, tags and alerts to a patient). Allergies are medical alerts, shown on the patient’s profile, as Record a patient’s medical history and files explains. When you drag that card to Arrived, a Scheduling alert for dialog opens with the patient’s first name and the alert: select Mark as arrived to go on, or Cancel. The alert also shows in red at the top of the patient’s panel.
Check a patient in by scanning
The QR code button next to + New Walk-In opens the Check-in scanner. Scan the code in the patient’s app, or find them under Manual lookup, then select Check in with their name: today’s visit moves to Arrived and any check-in points are added. Check in a patient with a QR code walks through the scanner.
Add a walk-in
A walk-in is someone at the desk without a booking. Velarya holds them on the board as a card in Arrived until you find them a time, they leave, or the day ends, and creates no sale while they wait.
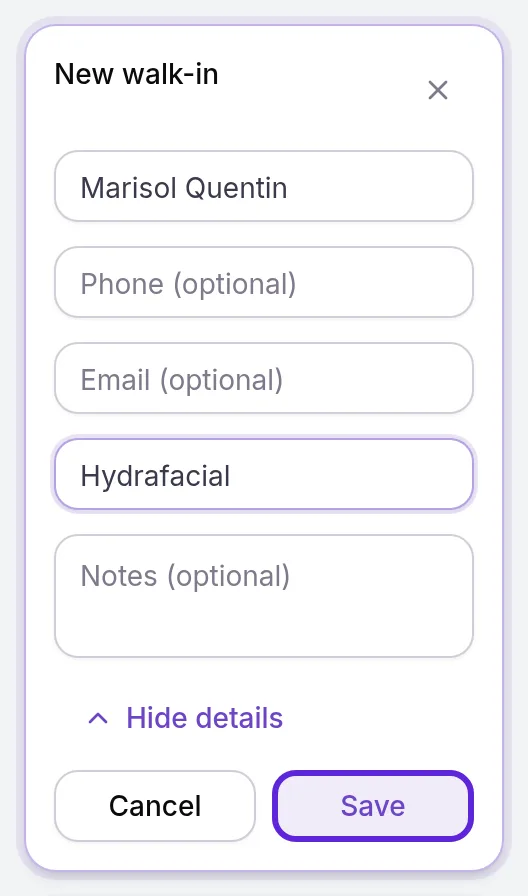
- Select + New Walk-In. A New walk-in card opens at the top of Arrived.
- Type the patient’s first and last name.
- Select Add details for Phone (optional), Email (optional), Service interest (optional) and Notes (optional). A phone number that matches a patient in Clients shows under “Matches an existing client?”: select the match to fill in their name. When you promote the walk-in, pick the same patient under Client so the visit joins their existing record.
- Select Save. “Walk-in added” appears with the name, and the card shows a Walk-in badge and Assign service & time.
If the person leaves, select the cross on their card, then Dismiss walk-in in the dialog that asks to dismiss them. They leave the board, and Velarya creates no patient record and no sale. Keep on board closes the dialog.
Turn a walk-in into an appointment
Promoting a walk-in books their visit on the spot and checks the provider’s, room’s and patient’s schedule, as the Calendar does.
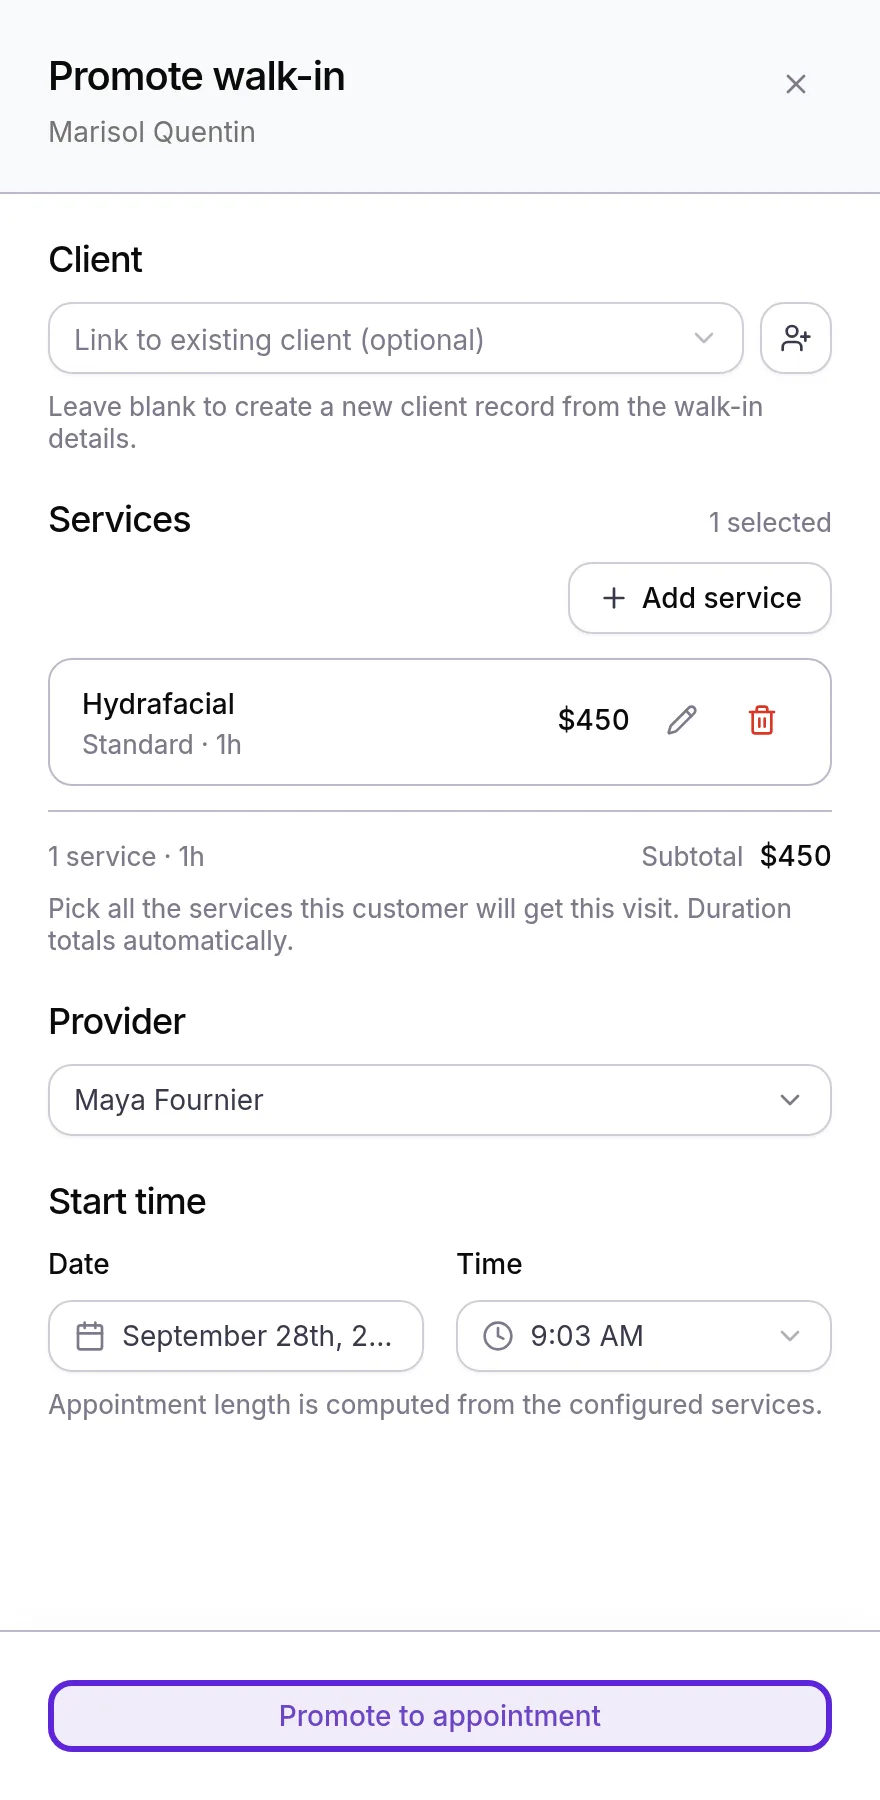
- Select Assign service & time on the walk-in’s card. Promote walk-in opens.
- Under Client, link the patient if they are already in Clients. Leave it blank to add them to Clients as a new patient from the walk-in’s name, phone and email.
- Under Services, select Add service, select every service for this visit, choose each Variation and select Done.
- Under Provider, pick who treats them.
- Check the Time. It starts now; keep today’s date.
- Select Promote to appointment. A message confirms the walk-in was promoted, and their card becomes a visit in Arrived that keeps its Walk-in badge. Each further service shows as its own card in Upcoming at its start time.
What happens when a walk-in is promoted?
Promoting a walk-in in Velarya turns the placeholder card into a booked, arrived visit with a sale behind it.
- With Client left blank, Velarya adds a new patient to Clients from the walk-in’s name, phone and email. Add a patient covers the other ways to add one.
- The visit’s sale appears in Transactions, unpaid, ready for checkout.
- The patient counts as arrived, so any check-in points are added.
- The walk-in card leaves the board, and the visit card keeps a Walk-in badge for the day.
When the time clashes with the schedule, This conflicts with the schedule asks you to Save anyway or Go back, as Book an appointment for a patient explains.
Hand a finished visit to checkout
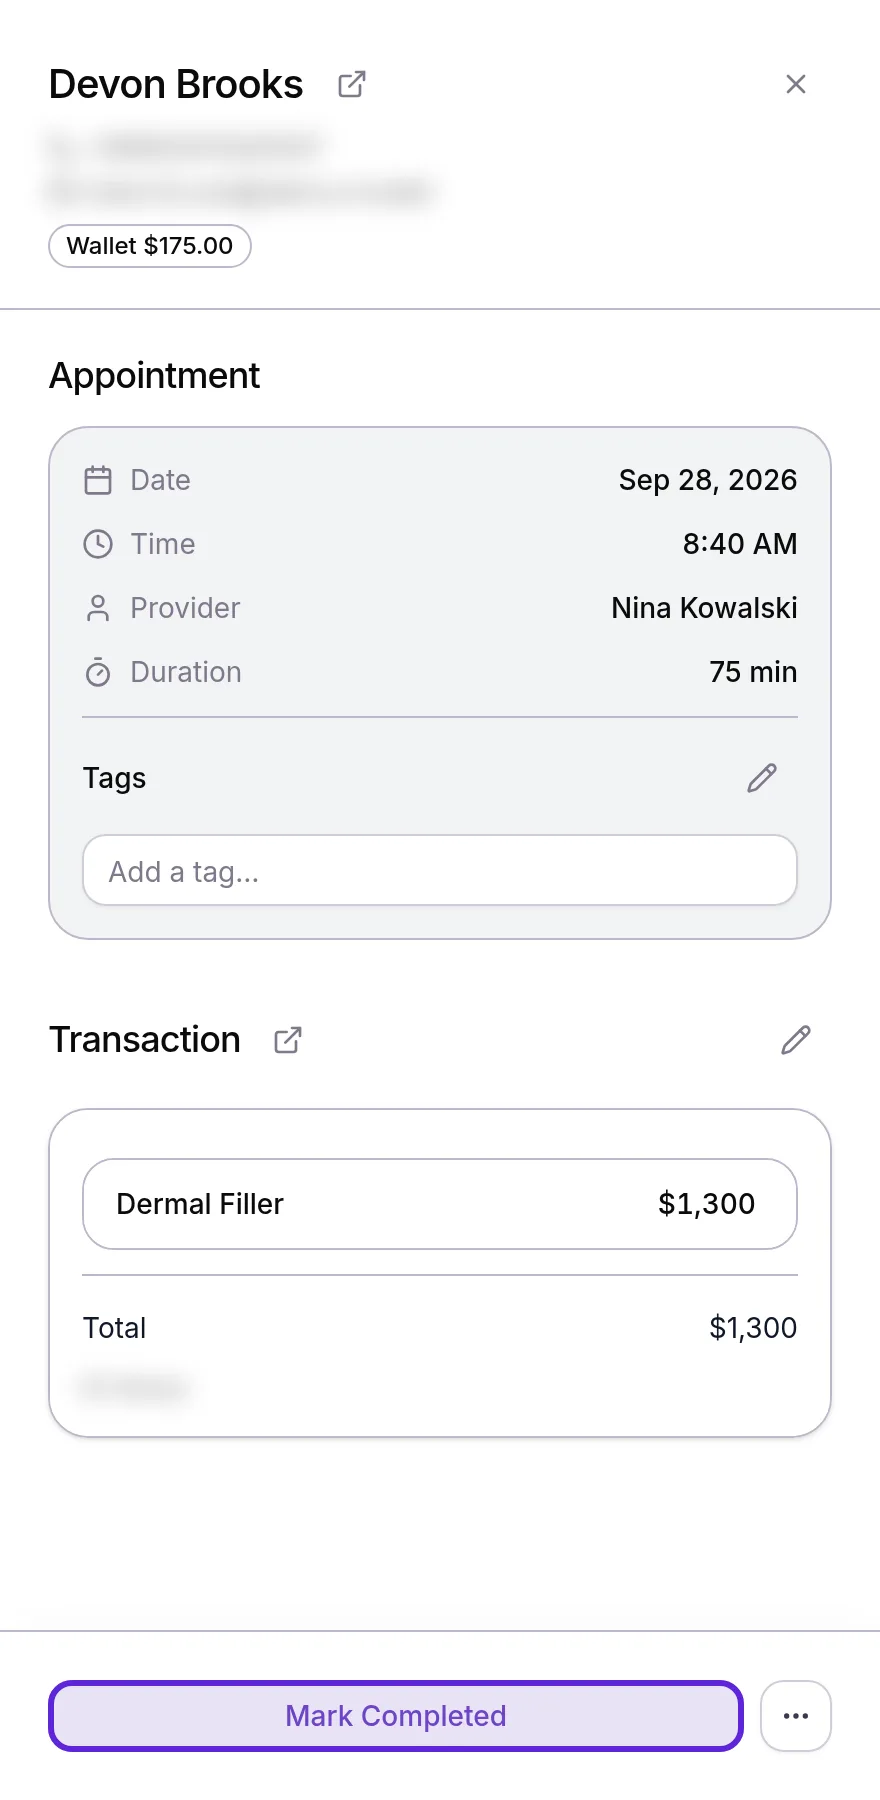
Moving a visit to Completed opens the Checkout panel. To take payment earlier, open the card and select Apply payment in the ⋯ menu of its panel.
- Select the patient’s card in In Session to open its panel.
- Select Mark Completed, or drag the card to Completed. The Checkout panel opens with the visit’s services and total.
- Choose how the patient pays in Checkout and take the payment, as Take payment at checkout shows. If the visit is already paid, the panel says Paid: select Complete & Close. The card shows a check mark and stays in Completed.
- To finish the payment later, select Save for Later instead. “Saved as draft” appears, and the card shows Parked. Select the card and Open Checkout to pick it up again.
A card already in Completed that has not been paid opens checkout from Open Checkout in its panel.
What do patients see?
A promoted walk-in gets the same booking confirmation as any visit booked from the Calendar. When a patient reaches Arrived, their check-in points land in the patient app as Check in a patient with a QR code describes. Confirming, starting or completing a visit on the board sends the patient no appointment message.
How does the Front Desk board behave?
The Velarya Front Desk board follows these rules:
| Situation | What Velarya does |
|---|---|
| You open Front Desk | Shows today at the location you are working in. Other days are on the Calendar |
| Order within a column | Sorts by start time, except Arrived (by arrival time) and Completed (latest first) |
| A card moves to Arrived | Records the arrival and adds check-in points, as a QR scan does |
| A card moves to Completed | Opens the Checkout panel |
| A visit your team booked has not been paid | Stays on the board with an Unpaid badge until checkout |
| A visit is paid in Completed | Shows a check mark and locks the card in place |
| A walk-in is promoted | Books the visit and its unpaid sale, and the patient is checked in |
| A walk-in is dismissed | Removes the card, with no patient record or sale |
| Someone else moves the same card | Refreshes the board and asks you to try again |
The board refreshes itself every 10 seconds, so a visit booked, moved or paid on the Calendar, in the patient app or at another desk appears without reloading the page.
If something goes wrong
“Unable to load appointments for this day.” The board could not reach your schedule. Select Retry, and check your connection if it keeps happening.
“Booking is off” on Front Desk. Enable online booking is off for your practice. An Admin selects Go to Booking settings and turns it on.
The walk-in button reads “No Access” and cards will not move. Your role has Calendar & appointments below manage. Ask an Admin to set it to manage in your role.
“You don’t have permission to view the Front Desk.” Your role lacks Front-desk board at view. Ask an Admin to add it.
The QR code button is grayed out. Your role lacks Check-in & scanning. Ask an Admin to turn it on in your role.
A message starting “Cannot move from”. Move the card back one column at a time, or use Move back to… in its panel. A checked-out card stays in Completed. To give money back on a checked-out visit, an Admin or Location Manager refunds it in Transactions, as Refund a payment shows.
“Another user updated this appointment. Refreshing…” Someone changed the same visit a moment before you. The board reloads; make your move again.
“Enter both a first and a last name” when saving a walk-in. Type the name as first name and last name, then select Save.
“1 service still needs its options configured” in Promote walk-in. Select the pencil on the service, choose its Variation, then select Promote to appointment again.
Frequently asked questions
Was this guide helpful?
Last verified