
Check in a patient with a QR code
Updated Last verified against the product
In short
To check in a patient with a QR code in Velarya, open Front Desk and select the QR code icon to open the Check-in scanner. Scan the code in the patient's app, or search under Manual lookup, then select Check in. Velarya moves today's appointment to Arrived and adds the patient's check-in points.
- Who can do this
- Admins and roles with Check-in & scanning turned on and Front-desk board set to View
- Applies to
- Each location separately
- Plans
- Scale, Branded and Connected
- Time
- 1 minute
Before you begin
- The Check-In challenge is on, with points in Reward: see Set up check-in rewards.
- To scan a code, the patient has an account with your practice in the patient app, where their check-in code lives. Manual lookup finds any patient in Clients.
Open the Check-in scanner
The Check-in scanner on the Front Desk page finds a patient from the QR code in their app, checks them in and adds their check-in points.
- In the left sidebar, select Front Desk.
- Select the QR code icon (Scan QR code) just left of + New Walk-In at the top of the page. The Check-in scanner opens on the right, on the Camera scan tab.

Find the patient and check them in
The Check-in scanner finds the patient from the QR code in their app, or from their name, email or phone number, and shows who it found before anything is saved.
- Ask the patient to open Your check-in code in the patient app and hold the QR code up to the camera. The scanner reads the code and shows the patient below it.
- Select Manual lookup instead when the patient has no phone with them.
- Type their name, email, phone number or the 12-character code under their QR code in Type name, email, or phone, and press Enter. The scanner shows every patient who matches.
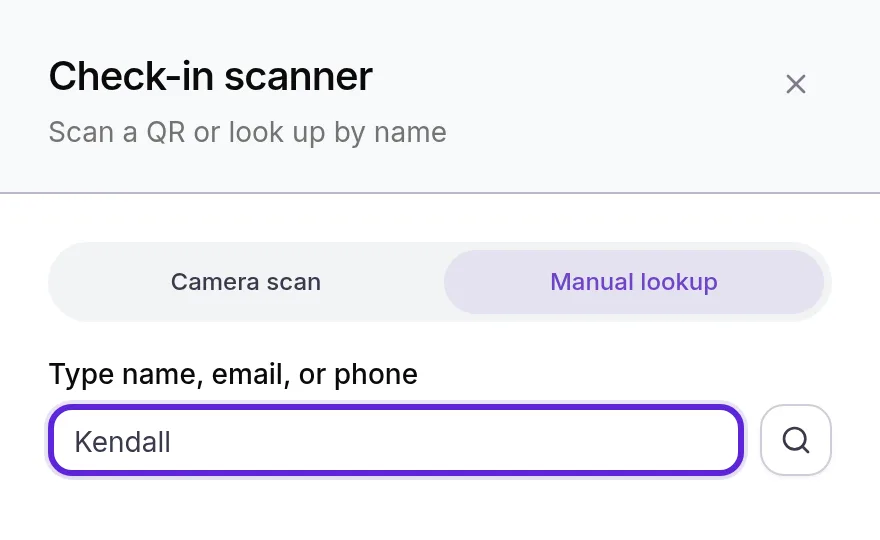
- Select the patient you are checking in, when more than one matches.
- Check the patient’s name, with their email or phone underneath, and the heading above them:
- Confirm check-in: the patient has one appointment today, and Velarya checks in that one.
- Pick today’s appointment: the patient has several, each shown with its time and treatment. The one starting nearest to now is Selected; select another to change it.
- No appointment today: the patient has no appointment today at the location you are working in, so the check-in adds the check-in points only.
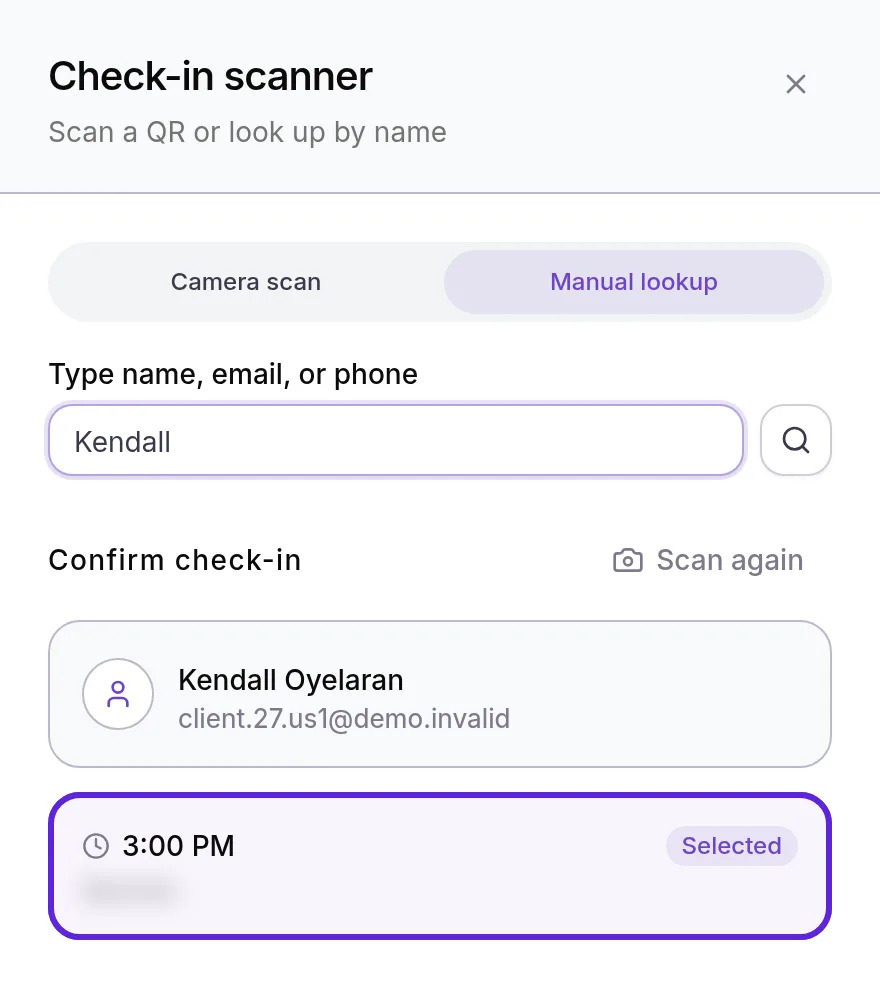
- Select Check in followed by the patient’s name, at the bottom of the scanner. The scanner closes and a message confirms the check-in, such as “Kendall Oyelaran checked in: 50 points added”.
The result looks the same after a scan and after a lookup. To start over with another patient, select Scan again.
Review past check-ins
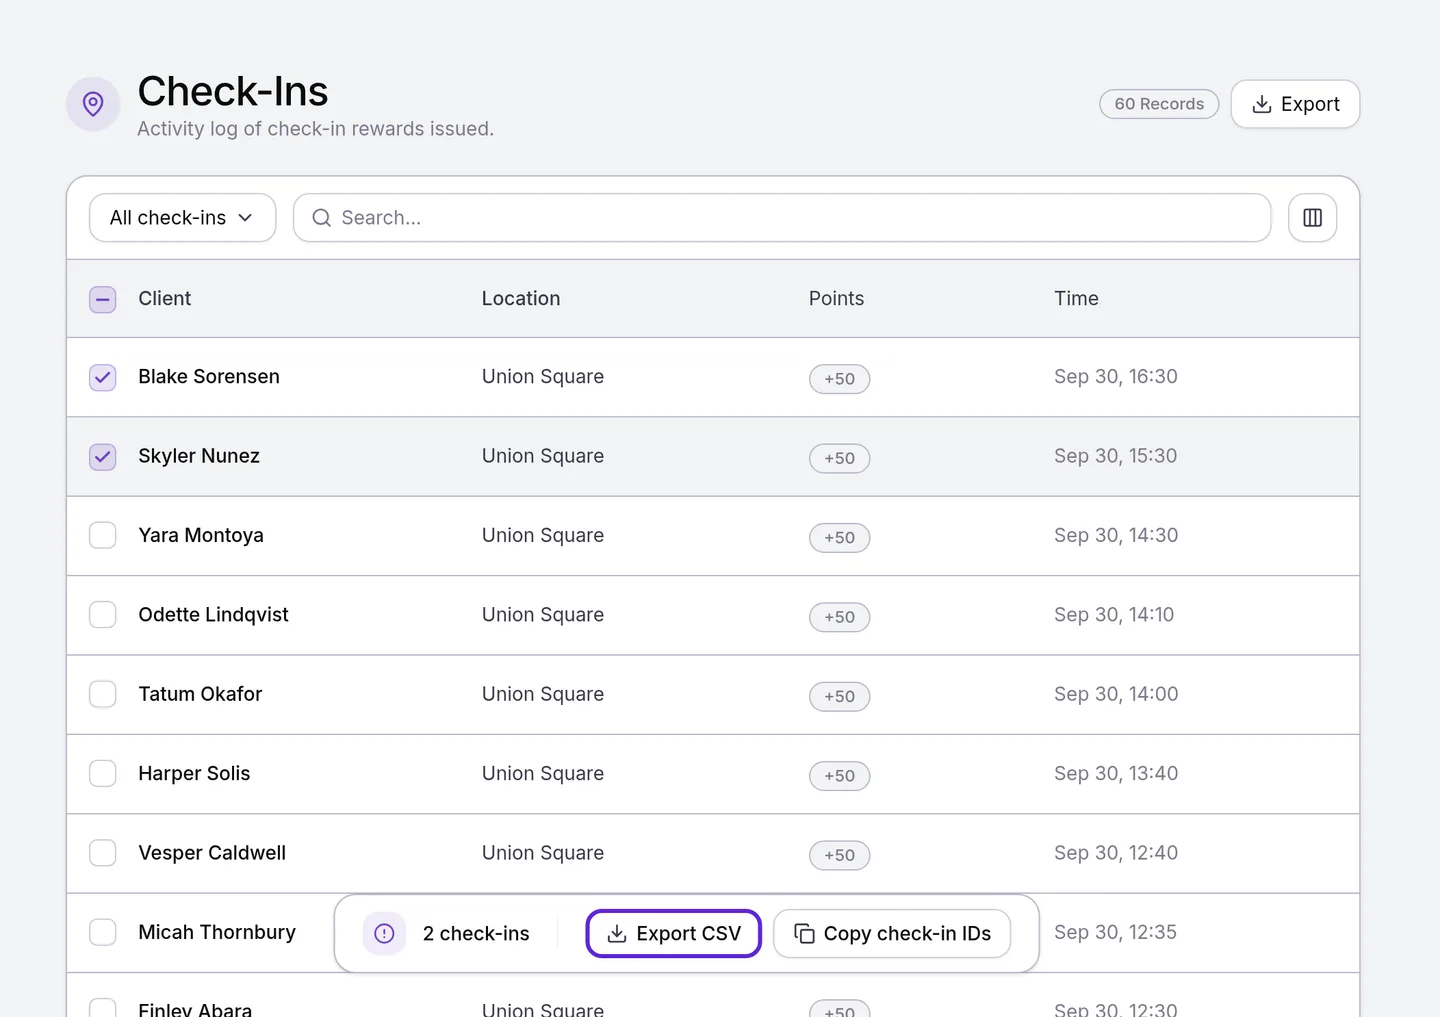
The Check-Ins page lists every check-in reward Velarya adds at the location you are working in, newest first, 50 to a page, with the patient under Client, the Location, the Points and the Time. The number of Records at the top counts them all. Admins with more than one location can choose All locations under Locations in the menu at the bottom of the left sidebar to list every location together. Patient names follow your role’s Client name visibility, on the page and in the export. The page needs Challenges (check-in/referral) at View, which Admins and Location Managers have by default.
- In the left sidebar, select Rewards, then Check-Ins.
- Select Export at the top right. Velarya downloads every check-in in the list, from every page, as check-ins.csv with the same four columns, and confirms how many rows it exported.
- To export some check-ins instead, tick them and select Export CSV.
What do patients see?
Patients open their check-in code with the round QR button at the bottom right of the Home tab in the patient app. They can also select Check In on the check-in challenge in the Rewards tab. A sheet titled Your check-in code opens with “One scan to check in and earn points.” It shows a QR code in your brand color and a 12-character code underneath, which staff can type into Manual lookup. The code stays the same every visit.
Once staff select Check in, the patient app confirms the check-in with the points earned, and a Points added notification follows. For every message patients receive, see Loyalty notifications patients receive. For how patients turn points into wallet credit, see How points work.
What happens when you select Check in?
A check-in with the Check-in scanner updates the appointment and adds the points in the same moment, following the rules of your Check-In challenge.
| Situation | What Velarya does |
|---|---|
| The appointment is Upcoming or Confirmed | Moves it to Arrived on the Front Desk board, records the arrival time and adds the check-in points |
| The appointment is already Arrived or In Session | Keeps its status, and adds the points if that appointment has not earned them yet |
| The patient has no appointment today, or only completed, checked-out, cancelled or no-show ones | Adds the check-in points only, at most once a day |
| The check-in earns no points under your Check-In rules: the Frequency limit, Max check-ins per patient, or the challenge switched off | Checks in the appointment if there is one, and the message says why no points were added. Without an appointment, the scanner stays open |
To change the points or the limits, see Set up check-in rewards. The other ways staff check patients in, and how the limits work together, are in How check-in rewards work.
If something goes wrong
“Camera access blocked”, “No camera found” or “Couldn’t start the camera”. The browser is blocked from the camera, the device has none, or another app is using it. For a block, select the camera icon in the address bar, set it to Allow and reload the page. Otherwise select Try again, or Use search instead to use Manual lookup.
“Patient not found” after a scan. The code belongs to the patient’s account at another practice. In the Velarya app, the patient opens Profile & Settings > My clinics, switches to your practice and shows the code again.
“Client not found” or “Patient not found with this ID”. No patient matches what you typed. Check the spelling, try their email or phone number, or type the code exactly as it appears under their QR code.
The scanner shows No appointment today for a patient who has one. The Check-in scanner lists today’s appointments at the location you are working in. Choose the appointment’s location under Locations in the menu at the bottom of the left sidebar, open the scanner again and look the patient up.
“Check-in rewards are not active, so no points were added.” The Check-In challenge is off. Admins, Location Managers and other roles with Challenges (check-in/referral) at Edit turn it on, as described in Set up check-in rewards.
The QR code icon on Front Desk is grayed out. Your role does not have Check-in & scanning turned on. The Admin, Location Manager and Front Desk roles have it by default. Ask an Admin to update your role; see Loyalty roles and permissions.
Front Desk or Rewards isn’t in the left sidebar. Front Desk needs Front-desk board at View, and Rewards needs Challenges (check-in/referral) at View. Ask an Admin to add them to your role; see Loyalty roles and permissions.
Frequently asked questions
Was this guide helpful?
Last verified
What changed
- : The Check-Ins page now shows 50 check-ins a page with the total count, and its new Export button downloads every check-in at once.
- : The Check-Ins log section now covers its Location column, All locations for admins with more than one location, and patient names shown per your role's Client name visibility. New screenshot of the log.