
Set up check-in rewards
Updated Last verified against the product
In short
To set up check-in rewards in Velarya, open Organization settings > Challenges, turn on the check-in challenge, enter the points per check-in in Reward, set Max check-ins per patient and Frequency limit, and select Save. Patients then earn those points when your front desk checks them in, within those limits.
- Who can do this
- Admins and roles with Challenges (check-in/referral) at edit or above
- Applies to
- Your whole practice, every location
- Plans
- Scale, Branded and Connected
- Time
- 5 minutes
Before you begin
- Patients use the patient app: the Velarya app, or your own app on the Branded and Connected plans. The check-in challenge and their check-in code live there.
- Your front desk team's role has Check-in & scanning turned on, and Calendar & appointments at manage to move appointments to Arrived, as the Front Desk and Location Manager roles do by default: see Loyalty roles and permissions.
Open the Challenges settings
The Check-In challenge is set on the Challenges page in Organization settings, below the Refer a Friend card, and applies to your whole practice.
- Open the menu at the bottom of the left sidebar and select Organization settings.
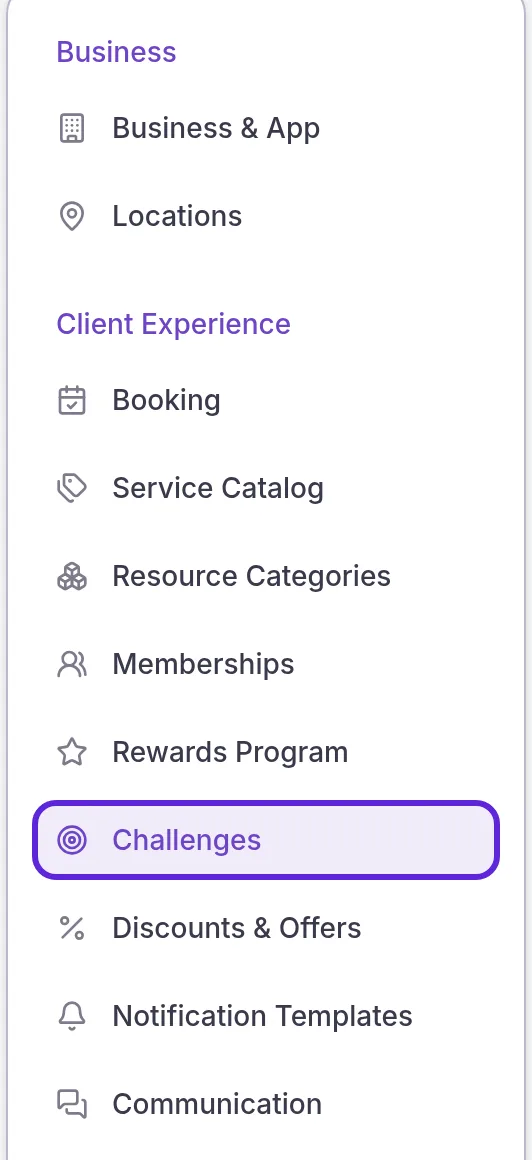
- Under Client Experience, select Challenges. The page opens with Refer a Friend at the top and Check-In below it.
Turn on check-in rewards and set the points
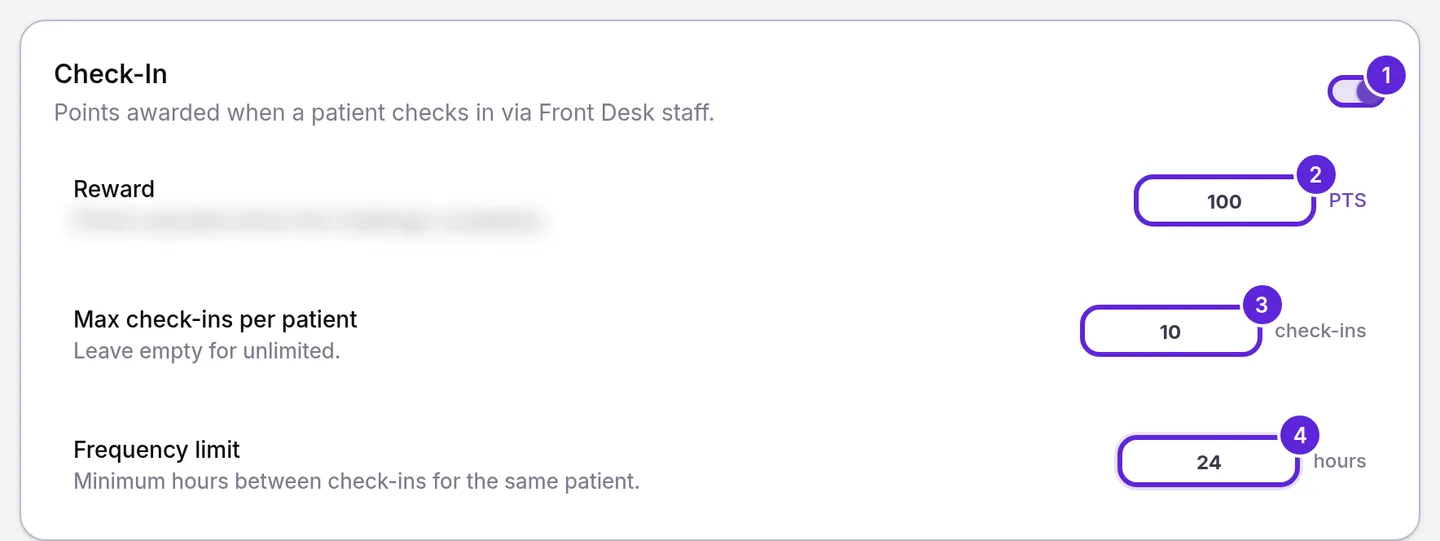
The Check-In card holds three settings: the points a check-in earns, a lifetime cap and the minimum time between two check-ins for the same patient.
- Turn on the switch at the top right of the Check-In card. The three fields become editable.
- Enter the points each check-in earns in Reward, as a whole number above 0. It starts at 0.
- Enter the most check-ins a patient can ever earn points for in Max check-ins per patient, 1 or more, or leave it empty for unlimited.
- Enter the minimum hours between two check-ins for the same patient in Frequency limit, a whole number from 1 to 8,760. It starts at 24.
- Select Save in the Unsaved changes bar at the top of the page. The bar closes, the challenge goes live, and the new settings apply from the next check-in. Patients now see the challenge in the app. Discard puts the three fields back to their saved values.

How much can a patient earn from check-ins?
A patient earns the check-in Reward for each check-in, at most once per Frequency limit, until they reach Max check-ins per patient. Check-in points convert to wallet credit like every other Velarya point, at 100 points to $1.00, and are whole numbers, so nothing is rounded. The table shows how the three fields work together for one patient.
| Reward | Max check-ins per patient | Frequency limit | What one patient can earn |
|---|---|---|---|
| 50 points | Empty (unlimited) | 24 hours | 50 points ($0.50) per check-in, at most once every 24 hours, with no total cap |
| 100 points | 10 | 24 hours | 100 points ($1.00) for each of their first 10 check-ins: 1,000 points ($10.00) in all |
| 250 points | 4 | 720 hours | 250 points ($2.50) at most once every 30 days, up to 1,000 points ($10.00) in all |
To set the points patients earn on what they spend, see Set up points earning. Check-in points are added on top.
What do patients see?
Patients see the check-in challenge on the Rewards tab of the patient app, under Challenges, once the switch is on and a Reward above 0 is saved. The card’s title gives the points each check-in earns, or, with a Max check-ins per patient, the total a patient can earn. The card also shows how many times the patient has checked in, and Completed once they reach your Max check-ins per patient.
Tapping the card opens the challenge, written from your settings:
| Part | What the patient reads |
|---|---|
| How it works | “Visit the clinic for your appointment.”, “Open the app and check in at the front desk.” and “Earn points for every valid check-in.” |
| More need-to-knows | Your settings, such as “100 points per check-in.”, “One check-in per 24h window.” and “Max 10 check-ins per account.”, or “Unlimited check-ins.” with no maximum |
| Check In | A button that opens the patient’s check-in code for your front desk to scan |
When staff check them in, the app confirms the check-in with the points earned, and a notification tells them the points were added. Every check-in that earns points appears in their activity as Check-In, with the points added. For how patients turn check-in points into wallet credit, see How points work.
Which check-ins earn points?
Velarya adds the check-in Reward when a staff member checks a patient in at the front desk, in any of these ways:
- Scanning the patient’s code or looking them up in the Check-in scanner: see Check in a patient with a QR code.
- Moving their appointment to Arrived on the Front Desk board.
- Selecting Mark Arrived on the appointment.
- Selecting Check In next to their booking in the Front Desk search.
- Selecting Promote to appointment for a walk-in linked to a patient.
The message staff see after each check-in says whether points were added, and names the reason when they were not.
| Situation | What Velarya does |
|---|---|
| An appointment is checked in twice, for example moved to Arrived and then scanned | Adds the points once: each appointment earns one check-in |
| An appointment is moved straight to In Session or Completed on the board, past Arrived | Adds no check-in points: the move into Arrived is the check-in |
| An appointment is moved to Arrived by mistake | Keeps the check-in and its points; take the points off with Adjust next to Rewards on the patient’s profile, as Adjust a patient’s points or wallet credit shows |
| The patient checked in less than the Frequency limit ago, at any of your locations | Adds no points; the message says the patient already checked in within that many hours |
| The patient has reached Max check-ins per patient | Adds no points; the message says the patient has reached the check-in limit |
| The patient has no appointment today | Adds the check-in points only, at most once a day |
| The Check-In switch is off, or no Reward above 0 is saved | Checks in the appointment and adds no points; the message says check-in rewards are not active |
Rewards > Check-Ins in the left sidebar lists every check-in that earned points at the location you are working in, newest first, with the patient, the location, the points and the time. Export downloads the list as a CSV file. Admins with more than one location can choose All locations in the menu at the bottom of the left sidebar to see every location together. For every check-in path and limit with a worked example, see How check-in rewards work.
If something goes wrong
The fields on the Check-In card are grayed out. The challenge is switched off. Turn on the switch at the top right of the card, and the fields become editable. With a Reward already saved, this also turns check-in rewards back on at once.
Challenges isn’t in my Organization settings menu, or the Check-In card is read only. Seeing the page needs Challenges (check-in/referral) at view, and changing it needs edit or above. Ask an Admin to update your role: see Loyalty roles and permissions.
The card shows “Must be at least 1”. The Frequency limit is empty or below 1. Enter a whole number of hours from 1 to 8,760 in Frequency limit, such as 24.
The card shows “Enter 1 or more, or leave empty for no limit”. Max check-ins per patient is 0 or below, and the field is outlined in red. Enter 1 or more, or clear the field for no cap.
The card shows “Set the points for a check-in (above 0) and save before turning Check-In on.” The switch is on and Reward is 0. Enter the points each check-in earns, 1 or more, and select Save.
The card shows “Must be 8760 or less”. The Frequency limit is more than 8,760 hours, which is a year. Enter a smaller number of hours, such as 720 for 30 days.
The card shows “Cannot be negative”. The Reward is below 0. Enter the points each check-in earns, 1 or more, and select Save.
A patient didn’t get check-in points. Check that the Check-In switch is on, Reward is above 0, and the staff member’s role has Check-in & scanning turned on: without it, the appointment still moves to Arrived and no points are added. The message staff saw at check-in names the reason no points were added, such as the Frequency limit or Max check-ins per patient. Both limits count check-ins at every location, so the earlier check-in may be at another one.
Patients don’t see the challenge in the app. The card appears on the Rewards tab only while the Check-In switch is on with a Reward above 0 saved, and only to patients signed in to your practice in the app.
Frequently asked questions
Was this guide helpful?
Last verified
What changed
- : Check-In now goes live when you save a Reward above 0, Max check-ins per patient takes 1 or more or empty for no cap, and troubleshooting covers both new messages. The rules table now covers skipping Arrived and a mistaken check-in, the Frequency limit FAQ explains the rolling window, and Rewards > Check-Ins mentions Export.
- : Rewards > Check-Ins now names the location of each check-in, and admins with more than one location can list All locations.