
Set up your loyalty program
Updated Last verified against the product
In short
To set up a loyalty program in Velarya, work through its launch path in order: the Earning Rule and Sign-Up Bonus, then the Birthday Gift, on Rewards Program; check-in rewards and Refer a Friend on Challenges; then membership plans. Give your team their roles, and test everything with one patient before you announce it.
- Who can do this
- Admins. Each linked guide names the permission its step needs.
- Applies to
- Your whole practice, every location
- Plans
- Basic, Scale, Branded and Connected
- Time
- 1 hour
Before you begin
- Your treatments have prices in Organization settings > Service Catalog, because points, vouchers and member pricing are counted from them.
- Card payments are set up in Organization settings > Payments, so patients can pay and join memberships in the app.
- On the Branded and Connected plans, your own app is published under your practice's developer accounts: Setting up your Apple and Google developer accounts.
Part 1: Set your points and rewards
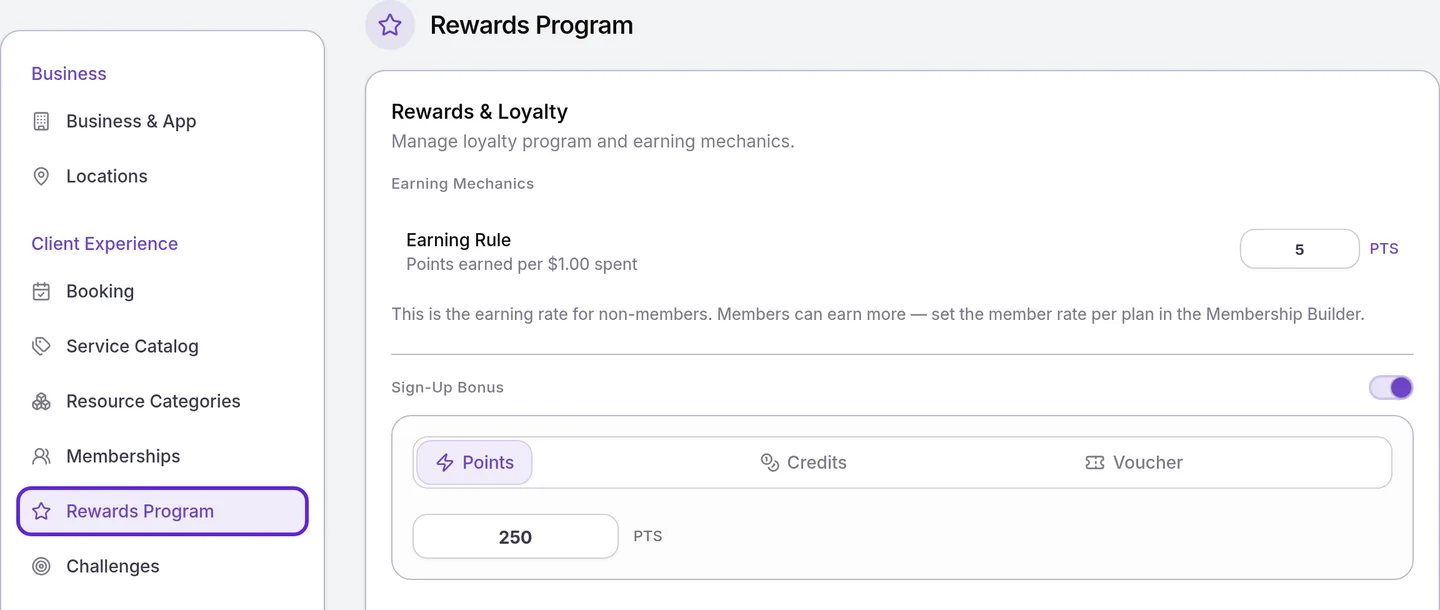
Velarya’s loyalty program starts with points on what patients spend, which every plan includes, and adds gifts when patients join and on their birthday and points for checking in, which Scale, Branded and Connected include. If you are on Basic, set the Earning Rule in step 1 and skip the rest of Part 1. All three live under Client Experience in Organization settings, which you open from the menu at the bottom of the left sidebar. When you change a field, an Unsaved changes bar appears at the top of the page; select Save there. The Sign-Up Bonus switch, and a challenge’s switch once its reward is saved, take effect as soon as you flip them.
- Open Rewards Program. Decide how much back each $1.00 earns in Earning Rule (100 points are $1.00 of wallet credit, so 5 points per $1 is 5% back) and what a new patient gets from the Sign-Up Bonus. Set up points earning walks both.
- Scroll to Birthday Gift on the same page. Decide the gift (a discount, a free service or points) and the Eligible audience. See Set up a birthday gift.
- Open Challenges and turn on Check-In. Decide the points each check-in earns and how often one patient can earn them. See Set up check-in rewards.
Part 2: Add referrals and memberships
Referral rewards and paid memberships are on every plan, including Basic. Add them once the rewards in Part 1 are saved, because a member’s points rate starts from your Earning Rule.
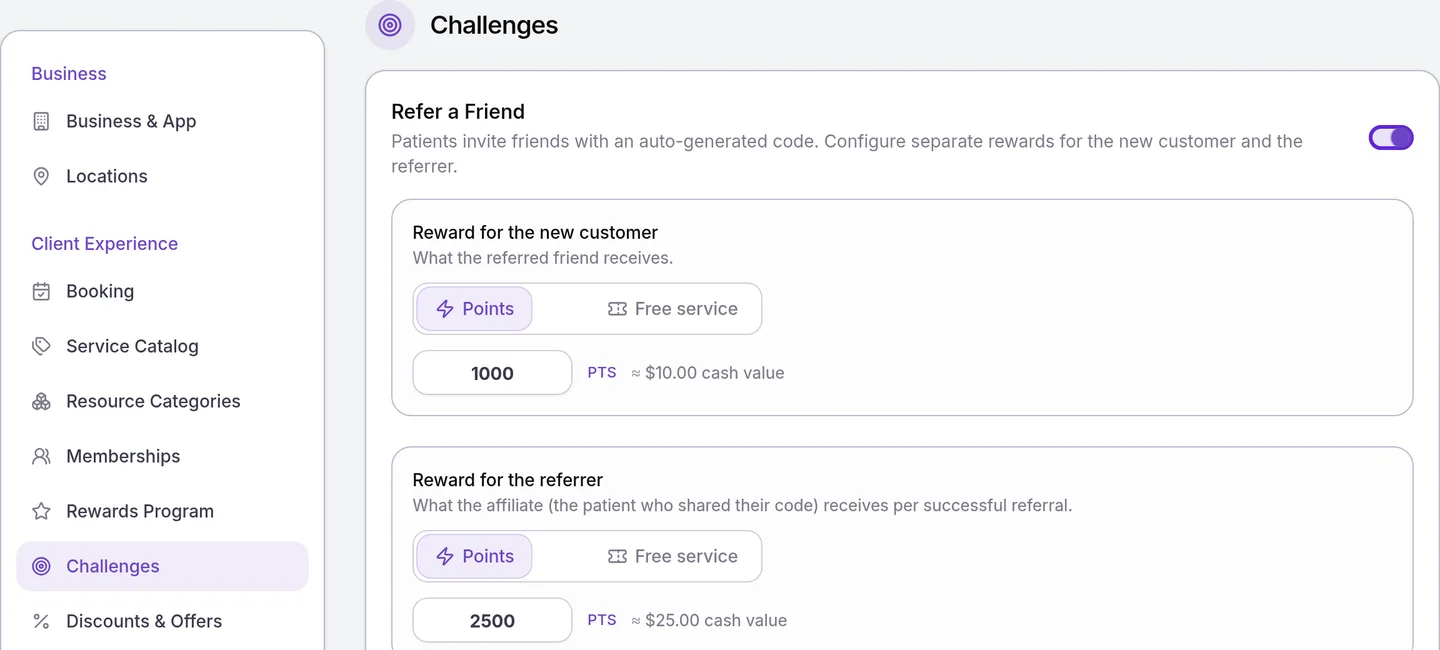
- Turn on Refer a Friend on Challenges. Decide what the friend and the referring patient each receive, whether the friend must spend or buy something first, and whether your team approves each referral. See Set up referral rewards.
- Open Memberships and select Add plan. Decide the price, how often it bills and what members receive each cycle. See Create a membership plan.
Part 3: Get your app and your team ready
Your patients meet the Velarya loyalty program in the patient app, and your team runs it from the dashboard, so both need a few minutes before launch day.
- Open Business & App and set your Brand Colour, About Us and App Icon. See Brand your patient app.
- Open Staff Directory, select each staff member and choose their Role. Decide who checks patients in, who adjusts points and who changes the rules, using the table under “Who on your team needs which permission?” below. See Loyalty roles and permissions.

- Select Manage in the left sidebar, then Memberships, and decide which plans each location sells. With more than one location, choose the next one in the location menu beside Location Settings. See How loyalty works across locations.
Part 4: Test it with one patient
A test run with one patient shows every part of your Velarya loyalty program working together before you tell anyone. A staff login and a patient account are separate in Velarya, so a team member can use their own phone.
On Basic, which has no sign-up bonus or check-ins, skip steps 2 to 5: your first points arrive with the first paid visit in step 7.
- Download the Velarya app, sign up with your phone number, and find your practice by name or ZIP code under Let’s find your practice! On the Branded and Connected plans, sign up in your own app instead.
- Open the Home tab. A points sign-up bonus shows on your points balance, with its rewards value in dollars.
- In the dashboard, open Rewards Program and scroll to Point Ledger. A points sign-up bonus is the newest row. It belongs to the whole practice, so it appears whichever location the ledger shows.

- On Front Desk, select the QR code icon (Scan QR code) and scan the code the app shows when you tap Check In on the check-in challenge. Select Check in followed by the patient’s name. The check-in points are added, and the check-in appears under Rewards > Check-Ins.
- In the app, open the Rewards tab. Your balance includes the check-in points, and Challenges lists the check-in challenge, plus Refer a Friend if you turned it on.
- Delete the test patient in Clients when the test is done, as Update, archive or delete a patient shows. Their Point Ledger rows and check-in go with the profile.
- After your first paid visits, check the Point Ledger again. Each award for a sale links to its order, so you can confirm the points match your Earning Rule.
What do patients see first?
Patients meet each part of the Velarya loyalty program in the patient app. This table lists what a patient notices first once you turn each one on.
| Part of the program | What patients see first |
|---|---|
| Earning Rule | Their points balance on Home and Rewards, with its rewards value in dollars and Redeem to turn points into wallet credit |
| Sign-Up Bonus | Their bonus as soon as they join, named on the last sign-up screen under Reward Unlocked |
| Birthday Gift | “When’s your birthday?” during sign-up (optional), then a Happy birthday! 🎂 notification on the day |
| Check-In | A check-in card under Challenges on the Rewards tab, which opens with Check In to show their code |
| Refer a Friend | A referral card under Challenges, which opens with Invite A Friend to show their code and share it |
| A membership plan | Unlock member perks! on Home for patients who are not members, with See Memberships |
| Brand Colour and About Us | The app in your color, with your About Us text under About on Home |
The Birthday Gift reaches patients in your Eligible audience who use the patient app and have a date of birth on file. Until a challenge is live, the Challenges section of the Rewards tab reads “No challenges available right now. Check back soon.”
Which settings apply to every location?
Velarya’s loyalty rules are set once and apply at every location, and each patient keeps one points balance and one wallet across all of them. A few choices are made per location.
| Setting | Where | Applies to |
|---|---|---|
| Earning Rule, Sign-Up Bonus, Birthday Gift | Rewards Program | Your whole practice |
| Check-In, Refer a Friend | Challenges | Your whole practice |
| Membership plans | Memberships | Built once for your practice |
| Brand Colour, About Us, App Icon | Business & App | Your whole practice |
| The plans a location sells | Manage > Memberships | Each location |
Points are counted on the price the patient pays at the location they visit. For everything that follows a patient between locations, see How loyalty works across locations.
Who on your team needs which permission?
Three of Velarya’s four system roles run a loyalty program day to day: Front Desk checks patients in and rings up sales, Location Managers also adjust points and run challenges, and Admins change the program’s rules.
| Day-to-day task | Permission | Held by default by |
|---|---|---|
| Check a patient in with their QR code | Check-in & scanning | Admin, Location Manager, Front Desk |
| See a patient’s points and wallet credit | Wallet, points & credits at view | Admin, Location Manager, Front Desk |
| Ring up a sale that earns points | Transactions / orders at edit | Admin, Location Manager, Front Desk |
| Add or remove a patient’s points | Wallet, points & credits at adjust | Admin, Location Manager |
| Sell a membership at the desk | Member lifecycle (pause/resume/cancel/change-tier) at manage | Admin, Location Manager |
| Follow Rewards > Check-Ins and Referrals | Challenges (check-in/referral) at view | Admin, Location Manager |
| Change check-in and referral rewards | Challenges (check-in/referral) at edit | Admin, Location Manager |
| Approve or reject referrals, with Approve referrals set to Manually | Challenges (check-in/referral) at moderate | Admin |
| See points awarded and redeemed in the Point Ledger | Rewards & loyalty program at view | Admin, Location Manager |
| Change the Earning Rule, Sign-Up Bonus or Birthday Gift | Rewards & loyalty program at edit | Admin |
| Build or change membership plans | Membership plan definitions at edit | Admin |
If something goes wrong in the first week
Patients see “No challenges available right now. Check back soon.” No challenge is live yet. Turn on Check-In with a Reward above 0, or Refer a Friend with a Reward for the new customer, on Challenges and select Save. Refer a Friend also leaves the app once its Campaign end date passes. Patients see a live challenge the next time they open Rewards.
Patients earn no points on their visits. The Earning Rule starts at 0, so enter a rate and save. Points arrive once a sale with a treatment on it is paid in full and belongs to the patient, as How points work explains.
A patient who joined this week has no sign-up bonus. Check that the Sign-Up Bonus switch is on with a value above 0; a Voucher bonus also needs a service. Patients who joined before you turned it on do not receive it. A patient you added at the front desk receives it when they sign up in the app with the same phone number or email.
The Point Ledger is missing a check-in or a sale. The ledger starts on the location you are working in. Choose the other location in its location menu, or All locations as an Admin.
The QR code icon on Front Desk is grayed out. The staff member’s role lacks Check-in & scanning. Give them the Front Desk role, or turn the permission on for their role.
Rewards is missing from a staff member’s sidebar. Rewards > Check-Ins and Referrals need Challenges (check-in/referral) at view, which Admins and Location Managers hold.
Patients can’t find your membership plan in the app. Open the plan in Memberships and check that Status is Active and Visibility is Public, then check that the location the patient chose sells it.
A patient you added at the front desk gets no texts. Patients added by staff start with SMS off until they agree to texts. Once they do, turn on SMS Notifications in Edit client details on their profile.
Frequently asked questions
Was this guide helpful?
Last verified
What changed
- : Referral setup now includes choosing whether your team approves each referral, and the roles table shows the moderate level of Challenges (check-in/referral) that approving needs. Patients see their code on an invite sheet, and a challenge without a reward or past its end date stays out of the app. Points are described as earned on paid treatments, switches that save at once are named, the test ends by deleting the test patient, and the guide says who sees the Point Ledger and who receives the sign-up bonus and birthday gift.